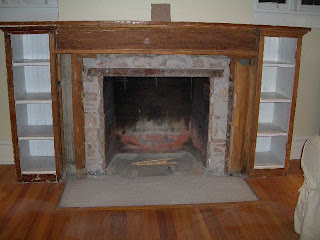
When Drew bought this house in 2001, he wanted to restore the living room fireplace back to what it may have looked like in 1910 when the house was built. He waited until he had a wife/cheap laborer to do it.
We started the project in November 2008. Somewhere along the way, previous owners had removed the small coal-burning firebox and installed this dazzling wood-burning beauty. Notice the raise hearth, which is handy for stubbing your toes.
First step was easy: remove the cover. I gave it away on Craig's List. Why anyone would want that ugly thing is beyond me.
December 28, 2008 work started in earnest. Drew thought he could cut through the tile and take it out in chunks.
But there was wire mesh and rebar underneath the tile.
The next weekend, while Drew was working, I decided we needed a bigger tool for the job, so it was off to the tool rental center.
Once home with the rented demolition hammer, I had fun jack hammering out the pink tile. I blogged about it here where I included a video.
The jack hammer revealed cool original tile. Unfortunately, there was too much damage to save it all. I do plan to make a small tile-topped table out of the good pieces though.
Later in January 2009, we got to the fun part (well, the jack hammering was fun too). I used the Silent Paint Remover heat plate to begin the process of removing the thick paint. This post has more detail on the paint removing process. I'd guess this paint stripping part, including using the Soygel non-toxic paint removing gel after we got the big stuff off with the heat guns, probably took 25 hours.
A pile of paint chips. No doubt there is lead-based paint somewhere in those layers.
Here is a picture showing the fireplace with most of the paint removed on February 8, 2009.
Meanwhile, we searched the city for a fireplace. I had Drew convinced we should buy a new natural gas burning insert. We shopped and shopped and didn't really find anything that looked old but would fit in our firebox, so we checked George's Architectural Salvage for an antique one. He didn't have one that was nice enough, but he directed us to a guy that had removed two from a remodeled house. We bought one complete unit from him. Once we found that, we ordered a very small gas coal basket set. It is like a gas log set, only it looks like coal instead of wood.
Another round with the jackhammer got us to here by late February.
Spring and summer put a temporary halt to our project. In August 2009, Drew found company that would install the antique coal-burning firebox. Abstract Masonry did a very fine job.
Here is the firebox installed. This picture shows the fireplace with the summer cover on.
But after a summer of slacking off this home project, (I think we were maybe riding our bikes instead. Possibly.) it was back to the rental center.
I had to remove a bit more of the mortar on the hearth in order to be able to slide our new tile under the wood flooring. This post talks about that day back in November of '09.
A couple more months of pain-staking work involving the use of dental tools too get paint out of all the nooks and crannies. That had to have taken another 6 hours or so. Drew mostly lost patience on that step, but I couldn't see going to all this work and expense and then still being able to see little white paint strips in the cracks.
Then there was the sanding, sanding and more sanding!!!! I estimate I sanded this bad boy for at least 12 hours using two different electric sanders and many sheets of sand paper. I tried not sanding that much, but when I applied a preliminary stain patch on one of the sides, I could still see the line between the original stained wood and the part that had probably been under a bench or wood box on the sides, so then I had to take everything down to bare wood. There was a patch of water damage on the top of the mantel too, which had to be sanded out.
It was a little dusty for a while.
Here you can see the hole in the floor of the firebox where the coal ashes used to fall down to the basement. Drew devised a trap in the hole and poured cement in it to make a new floor.
That was so that we could install the gas coal basket. We had to have an HVAC contractor come to run the line from the gas supply up through a hole Drew left in the new concrete plug. Drew and his dad then ran around town to find the right fittings and hook up the new appliance. That whole process probably cost about 10 man hours of Drew's time.
By February of this year, I had put a couple of coats of stain and one coat of polyurethane on. Staining was fun, but all the detail on the doors and mantel was time consuming. I think this step maybe took 12 hours.
Oh, and I can't forget about hunting for a few pieces of old wood, again from George's Architectural Salvage, that had similar grain to patch in the sides of the mantel and make new tops and bottoms for the "columns" on either side of the tile. The original pieces had been cut out to make that raised hearth. Of course, the pieces we found had paint and stain on them, so we had to strip and sand them too. I searched and searched for egg-and-dart molding that was identical to the old trim. None of the 5 or 6 specialty trim shops in the valley had the same size, and the stuff at the home improvement centers was either too big or too little. I finally found suitable trim at JoAnne Fabric and Crafts, of all places. Of course, the new trim was soft virgin wood of a species unlike our fir, so it didn't take stain the same way. I practiced stain alchemy, mixing and matching five colors of stain in various proportions to get the colors to match. That whole mess with the trim must have cost us 7 hours.
Somewhere about this time, on another bachelorette weekend, I painted the inside of the book cases. Funny how your don't notice a bad pain job until you go to paint over it. Someone had done a doozie in there. First, I tried 'ultra pure white' semi gloss paint, but it looked stark and sterile, so I went over the whole lot again with an off white. Chalk up another 5 hours.
I removed all the paint from the hardware and polished it up. Time estimate: 2 hours.
We were now finally ready for the tile, if it would ever get here! Custom-sized tile is not an off-the-shelf item.
In mid-February, contractor Jim Berneikie installed our tile. There were a couple of half days of prep work to ready the rough jack-hammered surface for tile. He got the floor tile laid in one afternoon, but then we ran out of tile! We had to wait a couple of weeks for more to be made. Would this never end?
Jim paid very close attention to detail, and he did a super excellent job! Everything is centered and lined up perfectly. The tile looks fabulous.
With the tile installed and the fireplace working, we were getting close. Good thing too since spring was right around the corner and the bikes were coming out soon. A couple more coats of polyurethane, grout sealer, and putting the doors back together completed the fireplace part. Then I had to caulk around the seam between the plaster wall and wood and do some touch-up painting where the paint removal process messed up the walls. Add another 15 hours for that. But now, after a year and a half, really, finally, the project is complete!!!
So, here is the 'after' picture. Are you ready for it? Wait, let's look at the 'before' one more time.
And now, finally, the fireplace.
Click on the picture for a large view, if you like.
Click on the picture for a large view, if you like.
Aah, I like to just look at it.
Here is a detail picture of the tile.
I found the small square Ginkgo leaf tiles on the internet way back at the start of the project. They were end-lot or rejects or something, so I got a good deal on them and they are special to us since they remind us of the Ginkgo tree we planted on our wedding day using soil brought to the ceremony by friends and family. (The tree, by the way, is planted in the backyard now and is doing fine.)
The trick after I found our accent tile, was to find field tile that complimented the accents. I looked everywhere on the internet and in town but could not find anything. Drew was the one who found Inside Out Architectural Tile here in SLC. The tiles that owner Leah had to chose from made our inner designers drool. Really amazing tiles! We finally settled on this beautiful green and tan hand-made tile from Trikeenan Tile Co. The tile looks nice in the pictures, but the real thing is gorgeous and has lots of texture.
More pics: Pigs on the mantel. What else?
The firebox with the summer cover on.
And more detail.
So how much time did this take us? If I add up all the hours recounted here, I get 125 hours, but it really seemed much longer than that. Maybe because it was our free time, or maybe I'm underestimating from memory. Add to that estimate about 40 hours of contractor work that we paid for. The fireplace is done, but we still have the rest of the wood work in the living room to strip. I don't even want to think about that right now.
When we finished in early March, it was still cold enough to want a fire on while we watched movies. That was cozy.
Here is one of those videos of the fire crackling. You can just click on it, move your browser window over to the side of your screen, and you'll have a small little relaxing fire while you surf the net.
We can extinguish the fire with a push of a button on the remote control. They couldn't do that in 1910!
Ah, so relaxing. I think I'll go enjoy the real thing with my hubby and a glass of wine and revel in our hard work.


